This 3 hour course covers learning how to give a dynamic lead belay with a GRIGRI, recognize and correct common clipping errors, manage the rope, and practice taking and catching falls.Below, I will review and reflect upon each component that we covered in the class. This is honestly more for my own benefit than anything else. By writing about it here I hope to really solidify the techniques before we take our practice test.
Rope Management:
Keeping your rope clean and organized is so important. While a climber is on the wall, you won’t have the time to untangle or unknot the rope. When you first get the rope bag, you just straight out dump it. Then, lay out your bag (that turns into a mat) about a meter away from the wall and to the right (if you’re right handed), find one end of the rope and tie a barrel knot in it. Be sure that this knot is off of the mat so that it is easy to find the end. Next, you flake the rope. Flaking the rope is basically just running it through your hands while piling it off to the side. This should look like a messy pile. I know it sounds strange but you’re really just piling the rope on top of itself until you get to the other end. That end will be for the climber to tie into.
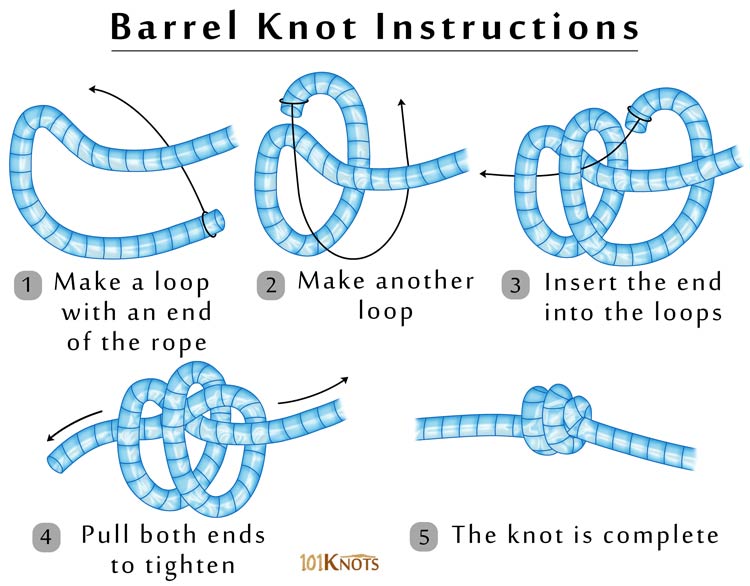
Once the climber is done on the wall make sure that their knots are all out before pulling the rope down. If there is still a knot in it, it will get stuck in a quickdraw (clip) and that is just a bad situation as you won’t be able to reach it. Once the rope is down and you want to switch out there are two options and it all depends if the climber took a fall or not. If the climber hasn’t taken a fall, great! The next person can just tie in on the same side of the rope and climb on. However, if the climber has taken a fall then you need to swap the ends of the rope. Where the climber was just tied in, that’s now the end of your rope. So take your pile of rope, slide it off of the bag, tie a barrel knot in the new end and flake the rope out again. Untie the previous barrel knot and have the next climber tie themselves in. This is important because it puts less strain on certain points in the rope. Basically so that there isn’t one spot in the rope that is constantly taking falls. It’s a good practice that makes the rope last much longer.
SAFETY CHECK!
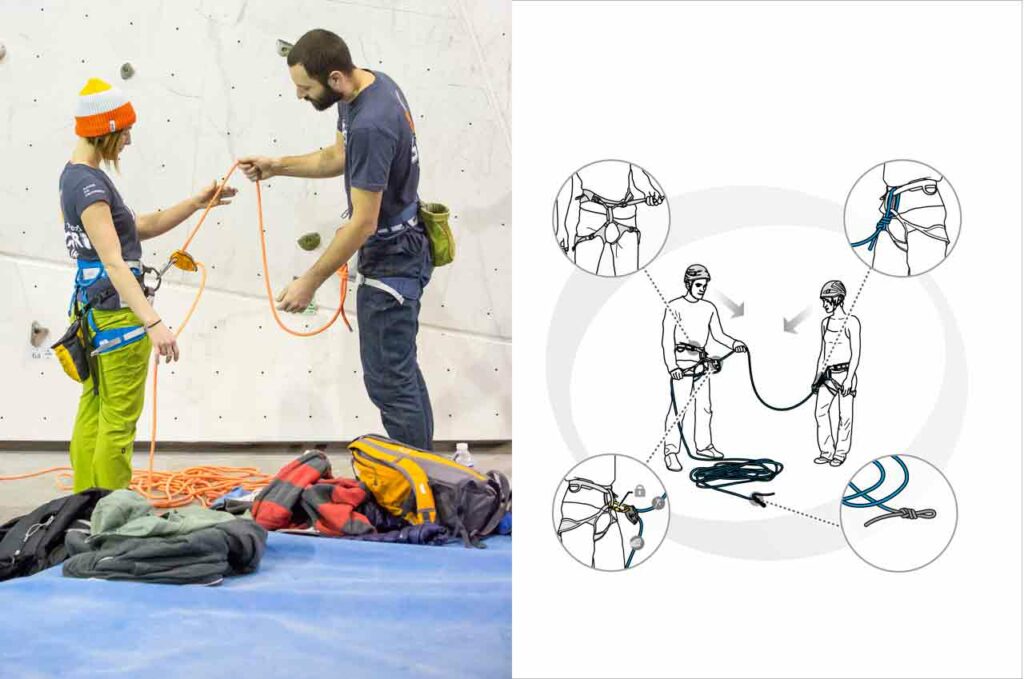
The safety check is almost the same as top roping. After everyone is tied in, the belayer checks the climber’s knot and makes sure that the rope is through the proper loops in their harness while the climber checks that the belay device (GRIGRI) is locked and through the proper loop as well. One additional thing the climber checks is to make sure the belayer has the rope going through the device the correct way. They check this by griping the rope that’s attached to them (close to their harness) and giving it a hard tug. The belayer should be pulled forward as the rope will lock the safety.
Lead Climbing:
I chose to cover lead climbing before belaying because honestly, it’s way easier. When climbing there is a lot less of a learning curve but still necessary techniques to keep you safe. The first thing is clipping, I have already covered clipping in a previous post, so if you’d like to you can check it out here. There is a lot to cover with clipping however here is a quick refresher: when clipping there are two techniques that CragX uses, but no matter the technique ALWAYS clip so that the rope is coming up through the carabiner. Additionally, the climber should clip when the quickdraw is between the shoulders and waist. Clipping when the quickdraw is high above the head or below the knees introduces a lot of slack and can cause dangerous falls. Next, communicating with your belayer. Your belayer is the one feeding (giving) you rope in order to climb up. To make their job and your climb easier, make sure to communicate with them especially when you’re about to clip. When you clip, your belayer has to change how they feed out rope, to give more, so without shouting “CLIPPING” and just grabbing the rope to pull, it will trip the safety feature on the GRIGRI and halt the rope. Without communicating, you use up more energy on your side and cause some grief for your belayer. So shout it out! Additionally, tangling in the rope is extremely dangerous and every effort must be made to avoid it. But this also falls into rope management.
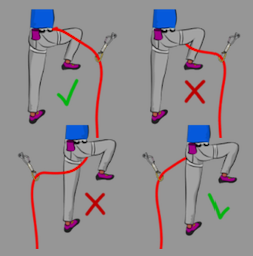
There is one other major thing to watch out for, tripping. Tripping is when a climber’s limbs (most commonly feet) are between the lead rope and the wall. The rope should always be between you and the wall or else it could cause a serious fall where you, as the climber, could get flipped upside down. It seems simple, but while climbing you aren’t always able to see your feet in positioning to the rope. This is something that your belayer also needs to keep an eye out for and call out to you if they notice it happening.
Dynamic Lead Belaying (with a GRIGRI):
This topic has a lot to cover. As the belayer, you have a huge responsibility to your climber. You’re the person keeping them safe up on the wall. Not only are you giving and taking rope when the climber needs it but you also need to watch what they’re doing. Calling out to them if they need to change their footing, about to miss a clip/need to redo a clip or manage the rope on their end. I’m going to cover SOME of what was taught to us, or at least the things that were fairly new to me and that I would like to continue to work on before the test.
First, when setting up a belay device (using a GRIGRI and the rope has been put into the device) the carabiner goes through black side (or the side opposite to where the rope gets fed into). Then the carabiner gets slid around so that the smaller point is towards the device end and the larger side is towards the harness.this is so that the locking mechanism on the carabiner is pointed away from your hand and the rope to make sure that it does not get rubbed and then unlocked.
Slack! It is so important to make sure that there isn’t too much or too little slack in the rope. Too little slack would make it hard for the climber to well, climb. So you have to give them a little space. You want a nice curve in the line but not so much that it looks like a smiley face. You don’t want the rope to droop down.
There are 2 methods to feeding out rope to your climber.

The first one is the universal technique. It is for slowly giving slack to your lead climber is climbing. To give slack, your brake-side hand pushes the rope towards the device, creating slack; your other hand pulls the rope through the device. To repeat this movement, slide your brake-side hand along the rope, without ever letting it go.
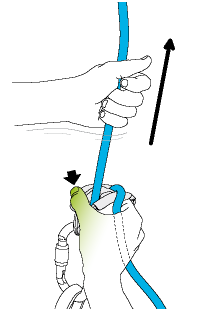
The second technique is primarily for when the climber is clipping. It allows you to feed out a significant amount of rope quickly so the device does not lock. While keeping three fingers of your brake hand wrapped around the rope, put your thumb over the back edge of the black handle and wedge your pointer finger under the lip on the right side. Press down with your thumb and push up with your pointer to hold the cam down, momentarily disabling the locking mechanism while you pull out slack with your left hand. As soon as you’re done paying out rope, go back to the primary belaying position.
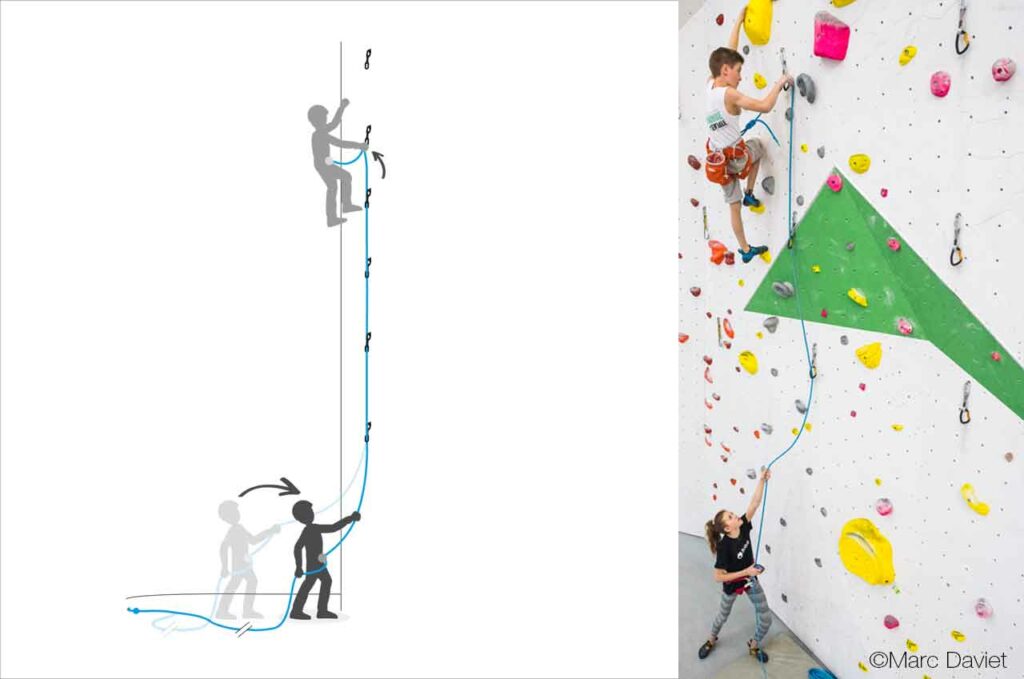
Stance: There is a reason why it’s called dynamic belaying, it’s not just one stance. You’re moving all of the time depending on where your climber is, what they’re doing, and what they need. For instance, you are to stand off to the side until your climber reaches the 3rd clip. You want to stay out from under the climber in case they fall, this is so they don’t fall on you. However, this practice is for in the gym only. If you are to climb outside you want to spot your climber until they reach the first clip. Once they have clipped into the 3rd quickdraw you can go beneath them or wherever you need in order to provide a safe belay. Another practice is to always keep within 2 meters from the wall (with your bag 1 meter from the wall you should never step behind it).
When the climber is about to clip, take a step in, use technique 2 to feed lots of rope to your climber, step back to your original position and continue belaying.
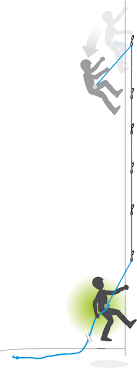
As your climber takes a fall, move with them so that they don’t fall hard and potentially injure themselves. What I mean by this is, do a small jump or take a step forward to reduce the impact force on the climber (this is for a dynamic belay). This is something that takes a lot of time to feel comfortable with. One tip that our instructor gave was to find a foothold on the wall that our first foot can come into contact with in order to lift up a bit for a soft catch before the climber went up.
Here’s a great video by Petzl Sport that explains a lot of what I’ve written out above. I did notice there were some things shown in the video that our instructor explicitly told us not to do (like holding the rope in your teeth). But for the most part, it’s a great resource.
And that’s about it so far… I’m definitely leaving out some items but these were ones that I really focused on.